A Guide to Photographing Fungi

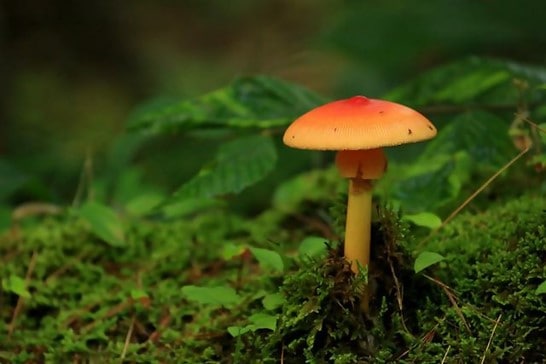
Although fungi are mostly out of sight underground working their magic within dense mycelial networks, these interesting organisms thankfully produce above ground fruits for reproductive purposes that lend themselves well to alluring macrophotgraphy shots. Out of all the possibilities in macrophotography, mushrooms are one of the most photogenic and exotic subjects to photograph with their wide variety of shapes, colors, textures, and sizes.
In this article, we will explore some techniques for mushroom macrophotography, including how to take the shots and how to edit them later. We’ll also recommend some gear, accessories, and general tips for getting started.
Before jumping into macrophotography techniques for fungi, it’s useful to get acquainted (if you haven’t already) with the basics of DSLRs. The exposure triangle is a great introduction to the fundamentals of photography, namely shutter speed, ISO, and aperture, and how they are interconnected to each other. With these fundamentals, it will make it easy to understand how these three variables can be tweaked to produce a variety of great exposures and compositions.
Introduction to Mushroom Macrophotography
Unlike when shooting wide, when you are shooting macro, you have much more control over the lighting conditions, and more broadly, the composition as a whole. Since mushrooms won’t be running or flying away, you also have a lot of flexibility and time to create the perfect angles, backgrounds, and colors in the shot.
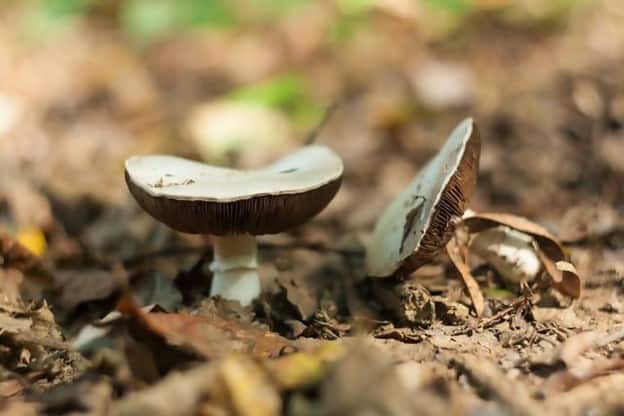
In general, mushrooms can be shot in situ (that is, in their natural environment) or in a closeup that fills the entire frame. They can be shot in a dream-like, almost abstract composition (such as a closeup of their gills or cap textures), or shot from a wider, further away view that emphasizes the background or the entire cluster of mushrooms.
When to go out on a mushroom shoot
The best time to go out to capture some mushrooms is in the summer, fall, or early winter after it rains a day or two. The humid environment will be conducive to fruiting. You may want to venture out in the early morning, which gives you plenty of time to patiently set up shots and peruse around the forest looking for (often hidden) fruiting bodies.
Look under piles of leaves, fallen branches, decaying stumps, and near the base of trees. Many photogenic fungi ike to form symbiotic relationships with tree roots. In damp, dense woodland areas, you can expect to find many species depending on where you live, including puffballs, stinkhorns, fly agaric (the mario mushroom), death caps, and much more. You may find turkey tail, chicken of the woods, or varieties such as Ganoderma spp on tree trunks. In this case, a telephoto lens will be needed.
Preparing for your first ‘shroom Shooting
Invest in some rain and dirt-resistant clothing and gear to make things comfortable
Since mushrooms typically start popping up in the damper, rainier autumn months, it’s a good idea to invest in some rain gear and waterproof boots. The toadstools will often be very close to the ground, sometimes just a few centimeters. This means you will be getting on your belly for some shots, especially if the mushrooms aren’t on a portable piece of wood that you can hang from somewhere higher. I highly recommend purchasing a rain and dirt-resistant tarp, groundsheet or yoga pad that you or your camera setup can lay on. Water-resistant pants and camera bag are also helpful.
To keep the camera still, there are many options
Since mushrooms grow in shady, dark places, it’s often necessary to take long exposure shots with low shutter speeds. These shots require the camera to be very still in order to gather as much light as possible while reducing the chance of movement artifacts or distortions. You can work with either tripods, beanbag stabilizers, or even just resting the camera on the ground if you’re careful.
Recommended Tripods
Tripods are helpful because they allow you to use small apertures and very slow shutter speeds which maximizes the depth of field. It allows you to lock in a specific composition, and it frees up your hands to set up the camera settings and lighting accessories such as reflectors, off-camera flashes, and diffusers.
The ideal tripod chosen for macro shots must be able to have legs that swing out and lock in a number of different positions, allowing for different camera elevations all the way to near ground level.
The Bonfoto B690A is a sturdy, lightweight tripod that works great in macrophotography, especially in backpacking environments like hardwood forests. The center column can be reversed and then the camera can be mounted at ground level for closeup shots.
Other great tripods for hard-to-get macrophotography shots include the multi-joint Gorilla Pod and the light and travel-friendly Platy pod.
Other Stabilizers work well too
In places where tripods have trouble, the Pod bean bag stabilizer does the trick. This stabilizer easily mounts to the end of the camera and lets you comfortably rest it at near ground level to get those hard to reach shots of the underside of the mushroom.
Of course, it’s always possible to simply rest the camera on the ground if you have a groundsheet and are willing to get down and dirty. Depending on the shutter speed you’re working with, this may work equally well.
In any case, its recommended to use a remote release or self timer rather than manually pressing the shutter. This lets you minimally disturb the camera which prevents tiny camera shakes. Try using a 2 second self-timer in your shots.
Recommended Cameras and Lenses
Since this article is tailored towards beginner and intermediate photographers, I’ll recommend a few cameras within Nikon and Canon that I’ve personally had experience. The Canon T7i and Nikon D3500 are both great beginner DSLR options.
If you want to get crisp, perfectly exposed close-up images, a macro lens is a must have. These lenses give you the maximum aperture and make mushrooms as small as 1cm appear full frame. Note, if you don’t have a macro lens, many DSLRs have macro mode. An extension tube can also be used which gets the lens further away from the focal plane, letting you get closer to the subject while still getting sharp focus.
For a Nikon user, the 105mm AFS-VR Micro-NIKKOR is currently one of the best macro lenses in its class. 105mm focal length will suit nearly everyone’s needs looking to do high-quality mushroom photography. The aperture range between 2.8 to 32 gives tons of flexibility to create the perfect composition. For Canon users, I recommend the Canon EF 100mm USM macro lens which sports a f/2.8 with excellent range of focus and superb image detail.
Before venturing out for your first mushroom shoot, don’t forget to bring extra memory cards and batteries.
Mushroom Macrophotography Tips
So you have your gear and you’re headed for the nearest hardwood forest. Here are some general guidelines to get you started to get the best mushroom shots.
1. Don’t be afraid to do some landscaping to prepare the shot.
Mushrooms tend to thrive where lots of organic clutter and debris may accumulate. If you’ve found some promising subjects, you may want to pull out pieces of grass, twigs, sticks, or leaves that may be obstructing the view. This is all with the fine print of try not to pull up live plants or disturb habitats.
Cotton swab and tweezers can also be handy to clean up the specimen or the background to make it as alluring as possible. Oftentimes, you’ll be surprised by what may be living on the underside of the mushroom that you weren’t able to see with the naked eye.
Once the mushroom and immediate area is cleaned up, you can introduce objects in the background to give the color scheme you want. For instance, you can set up a golden autumn leaf in the background which can be blurred with a low F stop. This gives the shot extra color which may complement the color of the mushroom.
Of course, you may want to intentionally leave in some of the environment to give a portrayal of the mushroom in its natural habitat, but definitely get creative with what sort of mushroom story you want to tell by controlling the background and surroundings.
2. Take an initial shot to judge the exposure time, size of aperture, and white balance.
Taking a rough initial shot helps you hone in on the right composition you’re looking for. It can be helpful to check the histogram of tonal values on your DSLR. If the distribution looks like a bell, with the dark and bright extremes small compared to the middle, you have a relatively good tonal balance. If the distribution is skewed, you may have clipped a highlight or shadow detail at the exposure settings you’re working at.
If you go a click one way with the aperture you have to go a click the other way with the shutter speed. That is to say, when the aperture hole gets wider, you must compensate with a faster shutter speed.
For instance, at a constant ISO of 100, if you move from f/4 to f/8 (reducing the diameter of the aperture, letting more light in), go 2 clicks down with the shutter speed to reduce the amount of time the light is entering (from, say, 2000 to 500) to maintain a good exposure. Once you’ve found the right creative shot and depth of focus (zooming in on the live view to adjust the focus), keep the camera in place from there on out.
It’s a great idea to experiment with different aperture settings. Take different shots at different ISO settings in low light to see which one is optimal for your camera. Try taking many photos under the same conditions at different aperture settings and shutter speeds, especially slow speeds if you have a tripod. If the mushroom is by a stream or flowing water source, a shutter speed of 1/2 second can accentuate movement and bring to life the background.
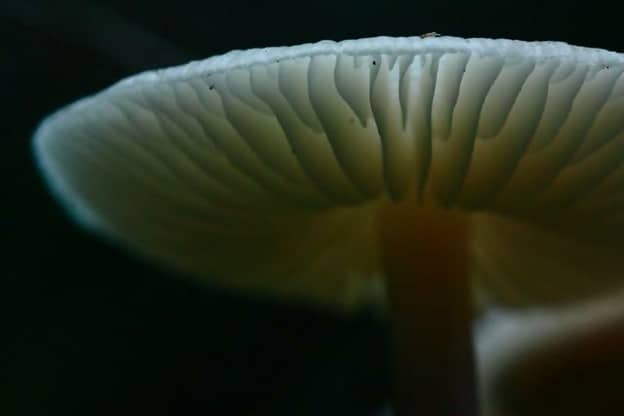
3. If the top cap shape or texture isn’t as interesting, consider getting low and capturing the margins and gills.
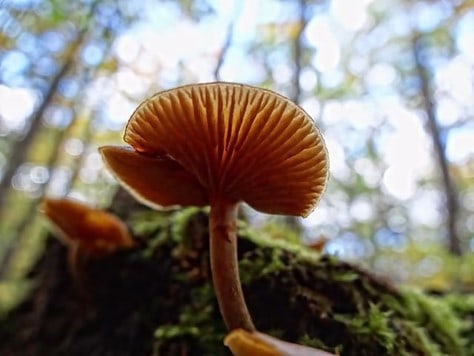
Get down low to capture more interesting shots of the underside of mushrooms. This allows you to tailor your shots to the individual mushroom. A relatively mundane cap shot may be brought to life by getting low and capturing the fleshy gills. If the cap has an interesting design and the underside is not lively, then try capturing the top. In the above case with a 4.5mm lens, an ISO of 160 was used, the aperture was set at f/3.2, with 1/30 shutter speed. These overexposed settings were able to bring to life the sunny canopy background while maintaining focusing solely on the mushroom underside.
It’s definitely a fine line, but it’s a good idea to avoid overly bright backgrounds which tend to draw the eye away from the main object (the mushroom) towards the background.
To get the background, you can bring with you a black piece of construction paper. This works best when the paper is placed on the dark side of the mushroom or in the shade.
4. Select a large aperture and shallow depth of field to make the background out of focus.
On the other hand, smaller apertures can be used to bring more alluring and colorful environments into the picture.
Playing with Light in Mushroom Photography
Macrophotography crucially relies on the strategic use of light to add clarity, detail, and creative expression to the shots. In general, the closer you are to your mushroom, the more light you lose through lens extension. When you are within inches, your lens will block daylight and your shallow depth of field will require you to stop down, causing the need for additional light.
Also, ambient and sunlight tends to come from above. This usually results in the cap of the mushrooms receiving more light than the gills or stalk, which remain underexposed. To correct both of these, this is where external flash and light accessories come in handy.
When you venture outside of ordinary pop-up flash, you gain a ton of versatility to capture and emphasize specific elements of the mushroom. We’re going to discuss what you can do to emphasize and highlight small details of the mushroom or make the mushrooms glow, giving a bioluminescent feel to the picture. First, let’s talk about some recommended gear to get started.
The Light Source
There are many options when deciding how you want to flash your mushrooms, from the professional to the macgyvered.
A single or multi flash with a slave unit for wireless synchronization can be very useful for some extra light, either to illuminate the sides or the back for a more natural look.
Ringflash can be helpful in creating shadowless illumination. These either mount directly on the lens or on an adapter between the flash and the lens. This ring flash works great on most Nikon DSLRs and is highly recommended for the range of brightness you can achieve.
External, off-camera flash allows you to introduce light to highlight certain details or illuminate all or part of the mushroom. While you can purchase macro flashes like these with flexible arms, though these can get pricey. A more affordable alternative is to simply use a portable LED. Headlamps or torches work well here, such as the Black Diamond Storm. These headlamps are waterproof and have red and green LEDs along with the very bright white LED.
It’s also possible to get some great lighting effects by using just your phone LED. While this may eat up the battery, it can effectively illuminate the side or belly of the mushroom and has the added benefit of not being more things to carry out into the woods. You can move it around to adjust the intensity and fine tune it in the live view mode and later in post-processing.
Reflectors and Diffusers
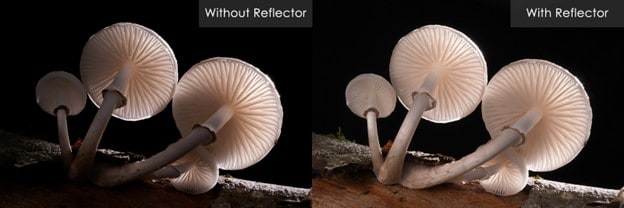
Reflectors and diffusers let you bring your macro shots to a whole new level. Reflectors allow you to bounce light underneath the specimen to brighten it up and bring out the details and textures of the underside. Reflectors such as these are a good option to add to your camera gear repertoire. They come in various colors, including white, black, silver, and gold. Gold will let you reflect warmer colors, while silver reflects the most light. Additionally, reflector panels like the ones recommended fold small and will fit in just about any camera gear bag.
You can also make DIY reflectors by using white mat board and optionally adding tin foil to it for more reflectance. They can be made either to stick in the ground as a panel or cut to be fitted around the lens, which would protrude through the cut area.
On the other hand, diffusers let you reduce the intensity of a harsh light source by passing the light through some sort of translucent material. With portable light sources such as LEDs, it’s possible to reduce the intensity by simply backing the light away from the subject, but with pop-up or ring flashes, it can be helpful to have a diffuser to diffuse and evenly distribute the light output of the flash. Some photographers opt for softbox diffusers like this or use a Lightsphere while many others make their own DIY diffusers out of a few millimeters of plastic or white linen.
Light Techniques for Mushroom Photography
Since the underside of the mushroom is often the most interesting, mushroom photographers commonly manipulate light to highlight these features. To do this, the composition must first be underexposed with a faster shutter speed.
First, keep the ISO around 100. This is the lowest light sensitivity possible and gives a dark, moody tone to the composition. At high ISO, you are more prone to image artifacts and light distortions.
Fill Flash
If you’re looking for a simple way to boost the lighting in the image and don’t want to use auxiliary flash, most DSLRs have a fill flash option. Fill flash supplements a lit scene with flash to fill in shadowy areas. The output of the flash is normally decreased a few stops so that the flash is balanced well with the ambient light. Try a – 1 ½ stops fill flash compensation. This will highlight the gills while generally avoiding overexposure.
Off-camera Flash and Reflectors
Underexpose the image 1, 2 or 3 stops depending on your personal preference, then light the subject with the external flash or LED. If the image is too bright, reduce the flash power or move it away from the mushrooms and try again. A reflector can be placed behind and below the mushrooms (out of frame) to further direct this light towards the stem and gills.
You can finetune this technique by playing with the f stop settings and previewing the image quality in the live view before accepting it.
Advanced Technique: Focus Stack
If you can’t quite get the depth of field you’re looking for in one single frame, you can try focus stacking. This method involves shooting multiple frames, sometimes upwards of 70 or more, and then adjusting the point of focus incrementally. In post-processing, this image is merged together to form a well-focused composition.
An example of a focus stacked image (made from the combination of 69 images) post-processed with a light mask to form the glow. This page offers details on how this was constructed in the software.
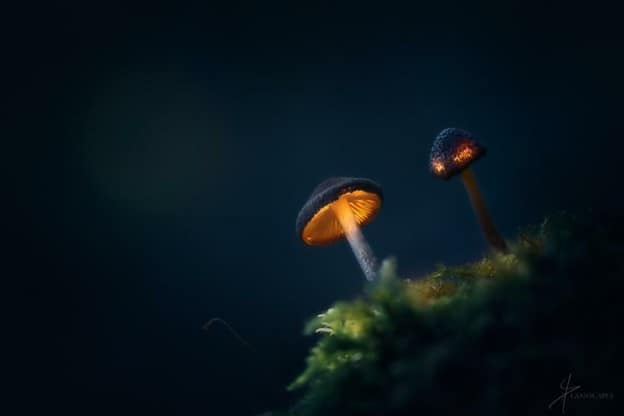
Have fun with light painting
You can bring along some small LED lights of various colors and colored tissue paper to light paint the mushrooms to your liking.

These oysters were found in the darker part of the forest and were light painted with some mini blue LEDs. Blue-colored tissue paper also works well to gel the light in order to create this effect. In this case, the image was underexposed 1-2 stops.
Tips for Editing Mushroom Images
There is nothing that can be done to make a blurry photo sharp, but in post-processing, one can accentuate highlights, correct the white balance, and remove grain and distracting objects. Photoshop is among the most popular editing software currently, with many tutorials on how to use the specific tools online. Adobe Lightroom 4 is another powerful and easy-to-use software.
For ultimate control over your shots, shoot in RAW format. In JPEG format, your camera will process the data for you and lots of source data is lost in the JPEG compression, but in RAW, your image will be unprocessed. This gives you more flexibility and makes the editing process easier, i.e. you can easily adjust white balance, color, saturation, sharpening, noise reduction, and much more in Photoshop or Lightroom. If you keep it in JPEG, you may not need to do more than straighten, crop, resize, and sharpen if you feel the camera’s auto settings handled the lighting well.
Straighten the photo and crop if needed. If the image is not quite on the horizontal level, the Filter/Lens Correction features in Photoshop can quickly make the photo straight. After you have drawn a line in the photo, the whole image can be rotated to be straight horizontally or vertically.
You can also crop your photo to bring attention to its strong points. You may want to emphasize certain parts of the photo that are more interesting. To do this, use the Crop tool.
Adjust the white balance. White balance adjustments prevent an inaccurate colorcast. While watching how the adjustments affect the histogram in the software, tweak the sliders in the different color categories, or alternatively, use Curves by navigating Image>Adjustments>Curves.
You may want to adjust overly dark or bright areas to highlight hidden textures and details. Other times, you may need to reduce the green RGB value until it looks like it did in person. If the light was too bright, try tweaking the contrast and clarity sliders. Be warned, small changes can create big effects in the photo, so try small changes.
Edit out distracting spots. When you have soft blurry backgrounds (from wide aperture shots), you can edit out background spots that are distracting and draw the eye away from the mushroom. To do this, use the patch or clone tool. Surround the area with the patch and drag to another part of the background to fill in that area. From here, a soft brush can be used to remove the edges of the patch and blend them together.
Use Image/Adjust/Image Size to resize. This lets you resize the photo for web pages or prints. Usually you will be working with more pixels than you need, so it will discard and resample. You can select the specific number of pixels you want the new picture to be. Turn on the chain link if you want the width and height to change together. Also view the image at 100% to know the true quality before and after resizing.
Sharpen the resized image. After resizing, you’ll want to sharpen the image. The Filter/Smart Sharpen feature will get the job done. Set the percentages somewhere between fifty and hundred for use on a web page. At too high of a percentage, you may get halos around the edges.
That’s about it! Whenever you decide to edit a photo, go back to the original file. This will prevent any megapixel loss from previous save compressions.
Conclusion
In a quick day trip out to the woods you’ll discover just how diverse the world of mushrooms really is. I’m often surprised by how elegant and beautiful ordinary mushrooms can be when you take a close look with a macro lens. Beyond aesthetics, if you’re interested in learning more about mushroom identification, this hobby can definitely boost the learning process!
Mushrooms are a great subject for macrophotography. They won’t be moving, so you can keep ISO relatively low and take long exposure shots to bring out the most detail. This means a tripod and some appropriate field gear will be highly useful to get the best shots.
When you’re out there shooting, you can creatively use lighting from different angles to accentuate places on the mushroom that don’t receive as much light, such as the gills and stipe. Sunlight filtered through a canopy can create some great effects, but consider using off-camera flash and LEDs to create the lighting effects that you want.
Have fun and don’t be worried about taking bad photos. There’s tons to learn even in photos that are washed out or blurry! Be sure to read the metadata information in the photos so you can pinpoint which settings worked and didn’t work.