The Beginner’s Guide to Growing Mushrooms

Growing mushrooms at home is an immensely engaging and sustainable way to make your own fungi to either eat yourself or sell for profit. Many methods discussed require minimal expense to start, and can yield several pounds of gourmet mushrooms that can easily go for 15 dollars a pound at a local market.
There is so much to learn when deciding to enter the world of mushroom growing, and this article will be a comprehensive introduction to growing as a beginner. There are a ton of resources online, and communicating with other growers in these communities and in-person will do scores towards increasing your growing knowledge.
An Overview of the General Mushroom Grow Cycle
Growing mushrooms successfully involves several successive steps from inoculation to harvest. Most techniques currently used try to mimic and optimize the natural growing cycle of mushrooms in the wild. In general, growing mushrooms is more complicated than growing plants. Mushrooms, which are really the fruiting bodies of the fungus (synonymous with the fruit of a plant), grow from mycelium, the white thread-like filaments which are the vegetative part of the fungus. To extend the plant analogy, The mycelia is synonymous to a fruit-producing tree.
Mycelium originates from fungal spores, and grows on an inoculated substrate into “grains” or “seeds”, or commonly, “spawns”, until the substrate is fully colonized by the fungus the grower has chosen. The substrate is the organic matter environment, sometimes called the compost, that the fungus absorbs nutrients and water from in order to grow the mycelial network and fruiting bodies.
Once the mycelium colonize the substrate in the pinning stage, pins develop into the baby mushroom caps. Anywhere from 10-27 days later, the caps mature, the veils open, and the mushrooms are harvested at the base of the mushroom. Once harvested, the growing area is commonly sterilized to kill spores, fungi, and bacteria and started again, producing multiple harvests over several months.
The Basics of Growing
We’re going to start off giving a basic outline of the fundamental concepts that must be known prior to starting to grow. We’ll see how it all connects together to form a successful grow operation.
Spawn
Spawn refers to the pure culture of the mushroom intended to be grown. It contains the mycelia of the mushroom and will continue to grow throughout the medium when in the correct environmental conditions. You can make your own using a sterile agar culture, but this optimally requires a clean lab environment rigged with a laminar flow hood.
The much easier option for the beginner is to buy a ready-made inoculate spawn from a mushroom cultivation website like Fungi Perfecti or from a local spawn supplier. These are dry brick spawns have dry, dormant mycelium that must be activated with moisture. For a comprehensive list of reputable cultivation websites, check out this page. Producing your own from spores can be more cost effective in the long-term, but on start-up, inoculate spawn are definitely the way to go in terms of efficiency and ease-of-use.
Substrate
The next thing you need to start a mushroom grow is the substrate, which is the area where the spawn will be inoculated in and where the mushroom mycelia will colonize. Mycelium require a nutrient-rich and humid growing medium in order to grow freely. Straw is a common substrate for beginners, chopped up into small pieces, but it can be corncobs, woodchips, cocoa seed hulls, cottonseed hulls, gypsum, coffee grounds, or any combination of them along with nitrogen-containing supplements.
In general, the substrate will depend on the mushroom variety that is growing. White mushrooms are generally composted in a moist environment such as manure. Shiitake, Hen-of-the-woods, and Lion’s Mane will grow well in a substrate of either wood and sawdust, while Oysters enjoy growing in straw.
The substrate environment is normally humid and dark. Since as much as 90% of the mushroom fruiting bodies is water, nearly all of it is taken from the substrate. To reduce contamination, the cultivator must use proper sterile technique. The main obstacle people run into is contamination of their cultures by a competitor fungi like yeast, mold, or some bacteria.
When spawn is added manually to substrate, it’s important to pasteurize the substrate to get it ready for the mycelium. To do this, growers chop the straw into small pieces, and wet the straw, then nearly boil it for about a half hour. In large grows, this is done outside with a propane burner and a 55-gallon drum or an electric drum pasteurizer. In smaller grows, this can be done on the stove with a pot or even in the microwave.
The Grow Environment
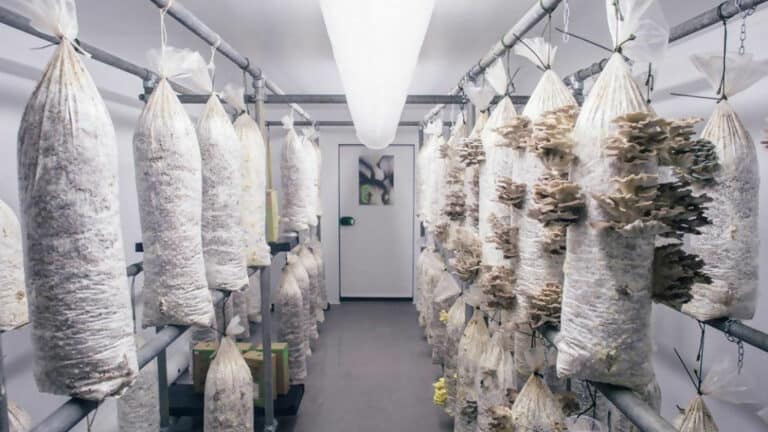
In the outdoors, you will often see mushrooms flourishing in damp, shady areas, under rotting trees and away from strong winds and direct sunlight. The grow environment is a controlled environment that emulates these conditions. When these environmental conditions are met, the mycelium will eventually colonize the entirety of the substrate. This environment is normally tailored to the amount of mushrooms the grower is looking to harvest. Growers that use hanging grain bags will fit their grow room with shelved racks, while growers using logs will equip their environment with sturdy bars to lean the logs on.
The environment has to be kept consistently moist to keep the mushrooms growing well, so all materials used when designing the grow room must be resistant to mold contamination and decomposition (such as wood). In indoor grows, this is usually the basement, which is dark and moist.
Four environmental factors that are controlled in this area are humidity, temperature, carbon dioxide levels, and lighting levels, which we will individually take an in-depth look at.
Carbon Dioxide
Controlling carbon dioxide involves adequate air ventilation. Mushrooms breathe oxygen just like humans, so all mushrooms need fresh air exchange to grow properly. High amounts of carbon dioxide will skew the grow, making the mushrooms produce long, chewy stems and small caps. Keeping carbon dioxide levels managed requires a blower fan that brings air into the grow area as well as proper ventilation holes in things like buckets and containers.
Humidity
Humidity is another crucial factor to a successful grow and must be constantly supplied while ventilation is occuring. If the humidity is low, the mushroom will not form or will become cracked. Too high of humidity on the other hand will predispose the substrate to contamination from mold and other microorganisms.
In general, the grow area should be slightly damp, so it is normally misted a few times per day to prevent the substrate from drying out. In very dry desert climates, it is useful to purchase a humidifier to keep growing rates optimal and the mycelia happy. Humidity levels are also managed with drainage holes in the grow area, so that water saturation doesn’t occur and lead to mold growth.
For instance, in indoor bags or bins, it is necessary to drill holes in the bottom and sides for water to run out and for the pins to grow out of. In outdoor grows, it is important to choose a location that is moist and not overly saturated with standing water, which may be based on the climate or controlled with a humidity tent. In large-scale indoor grow rooms, a mid-size grow chamber may be used.
The precise humidity conditions vary among the variety of mushrooms, shiitake should be kept around 35-45% RH, while button mushrooms require a moist medium such as manure or compost. A cheap hygrometer can be purchased to know precisely what the levels are at, but this isn’t required.
Temperature
Temperature can be controlled indoors either through heaters or fans, and is usually set somewhere between 55-75F depending on the mushroom variety. Outdoors, temperature is normally climate-dependent but can be managed through strategic placement of the grow, such as in shady spots with indirect sunlight, as well as the use of things such as fruiting blankets. Indoors, a cool closet or unheated basement are great options. Like moisture, temperature needs also vary based on the mushroom variety growing. Button mushrooms need between 55-60F, enokis require even cooler temperatures than that, and shiitake grow optimally around 72-78F.
Lighting
Mushrooms don’t have chlorophyll like plants because they don’t produce their own nutrients from the sun. For this reason, mushrooms don’t require direct sunlight, which is mostly avoided to prevent the grow area and mycelia from drying out. Some level of darkness will help preserve some of the moisture needed to reproduce while some indirect sunlight will stimulate the fruiting body growth in the fruiting phase. A commonly recommended light level is enough light to be able to read a book.
Growing with Grow Kits
The easiest way to start growing mushrooms as a beginner is to using a grow kit. It will get you familiar with the grow process and what is needed in order to grow without requiring special skills, equipment, or technique. Home grow kits take up little space and don’t need direct sunlight like plants. They can be grown in secluded closet corners, underneath the kitchen sink, or in other slightly humid places with indirect sunlight.
Grow kits contain spawn that have already colonized the substrate, which vastly simplifies the beginning process. The mycelium-filled block is typically contained in a tightly-packed grow bag. The spawn is inoculated through the holes in the bags, and oftentimes mycelia will grow right off the bag and during harvest, the top of the bags are chopped off. You can mix the kit with dry organic matter such as straw, sawdust pellets, garden debris, or coffee grounds if scaling the grow up or experimenting with different growing substrates.
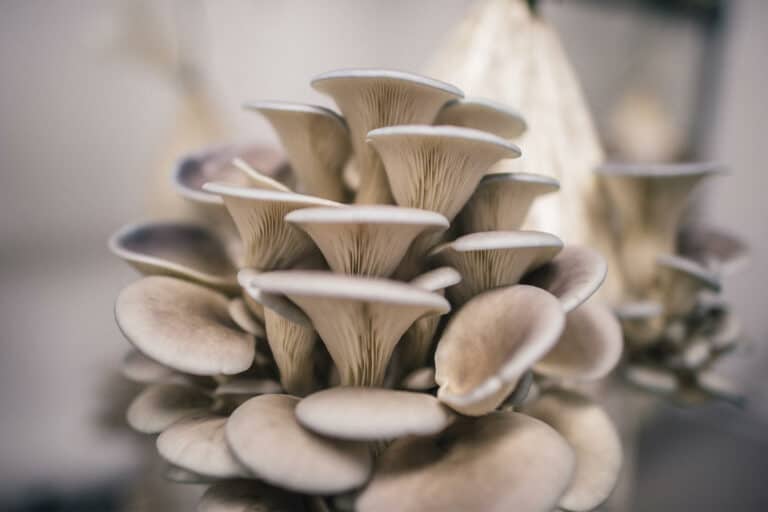
One of the most common mushroom varieties in grow kit form is the oyster mushroom, or Pleurotus ostreatus. This is a great beginner choice because they grow on a wide variety of substrates, fruit easily and relatively quickly, and are resilient to contamination from molds, bacteria, and yeast. This variety needs plenty of fresh air and humidity compared to other varieties like white mushrooms.
Some Recommended Grow Kits
The great beginner gold standard is the oyster mushroom grow kits. The Back to the Roots oyster grow kit contains everything you need and will grow oyster mushrooms in about ten days. The only thing required is a suitable growing environment and some frequent watering until harvested. If for whatever reason the mushrooms do not grow, the company will replace the grow kit for free.
If you’re looking for good ole’ vanilla button mushrooms, these grow kits from Mushroom Adventures are a great option. These claim to create buttons within 10 days. White mushrooms are widely used in pizzas, soups, stir-fries, salads, and when cultivated at home, they bear many “fruits”.
Growing shiitake is a little more involved, but this is a great first grow kit made of a block of sawdust that produces shiitake within two weeks.
One of the easiest to grow is Lion’s Mane. Not only is it a beautiful sight to behold, but also very tasty! As long as the humidity is above 60% from either the climate you live in or a humidity tent, you can grow them straight out of the bag they come in by cutting holes in the bag, no misting required. This grow kit claims it can produce up to four pounds with three to four crops, and only requires a light misting.
If you want to move on to more advanced grows and have more flushes, mushroom grow kits can be used as spawn. Since the kit is essentially fully colonized substrate, you can expand the kit to grow more mushrooms by adding the crumbled kit into a bulk substrate such as pasteurized straw, and adding that to a shotgun fruiting chamber indoors or growing bed outdoors.
Growing Indoors
There are a variety of ways to grow mushrooms indoors without grow kits, but we’ll focus on one economical option that will result in a good yield and isn’t too complex. To start, first gather all of the required materials so that the whole process can be streamlined without delays. Obtain a spawn of oyster mushrooms, such as from here, and either plastic bags or tubes such as these cultivation bags, straw from a hay bin, and a shelf, such as this one from Amazon. Avoid alfalfa or green straw, these varieties tend to favor the growth of undesirable microorganisms. Also worth mentioning, there is a large variety of different oyster mushrooms to grow – including pink, yellow, pearl, blue, and grey, and all of them will grow well by this method.
Substrate Preparation
To start, pasteurize the straw. Chop the straw down into small pieces to break its waterproof coating. Pack the straw into a 5-gallon container and add boiling water to cover. After sitting for thirty to forty five minutes, drain the straw and let it cool to room temperature.
Next, have your spawn ready, equal to about 10% of the weight of the straw. You can either mix the straw and the spawn by hand when the straw is cooled, or add it to the bags along with the straw. In the latter case, for every few inches of straw added, sprinkle the spawn on top, until the plastic tube or bag is almost full. Punch holes in the bags six inches apart using a nail and store on shelves that can handle the humidity.
Incubation
Store in a dark, cool place around 55-70F until fully colonized, which may be anywhere from 7-24 days depending on the variety. When colonized, the substrate will be covered by white fuzzy mycelia. If there are any dark spots of green or brown (just like moldy bread), remove them from the substrate and throw them out. Since light should be minimized during this step, a red darkroom light can be used when checking on the grow.
Fruiting
The fruiting process will take anywhere from 5 days to 2 weeks once the pins have developed. The mushrooms will need elevated moisture and humidity during fruiting, some natural indirect light, about 12 hours a day, and plenty of fresh air. The developing mushrooms will head towards the indirect light and grow through the holes in the bags made by the nails. Mist several times per day with a spray bottle to keep moisture levels high. To accelerate the fruiting process, the mycelia can be shocked by refrigerating the bag for one day, but this isn’t necessary.
Harvesting
When picking the mature mushrooms, pick up to the base of the stem that is embedded in the medium. They can be either cut off at the base or twisted off with clean hands. Leaving too much of the base portion can predispose the habitat to microbial growth that can hinder subsequent mushroom growth in additional flushes. Use a paring knife to remove stubs that remain embedded. After harvest, the bag should produce three to four flushes or fruitings over the course of a few months.
Try a Shotgun Fruiting Chamber (SGFC)!
An alternate grow environment that works well for indoor grows is a shotgun fruiting chamber, named aptly for the shotgun pellet-like holes all around the container. The added perlite added soaks up the water in the air and provides a steady stream of humidity while the holes provide adequate gas exchange. This chamber can be used for bulk substrate such as straw, husks, etc. or with grow kits. Just simply place the moist grow kit inside the chamber. Here is an excellent guide to creating one relatively simply.
Growing mushrooms in coffee grounds
Growing mushrooms on coffee grounds is an easy and efficient way to get started. Even though coffee grounds are commonly thrown out, they are packed with nutrients and can be put to good use in DIY projects like this. They also don’t need to be pasteurized since the hot water takes care of that for you. Also, oysters love coffee grounds!
The coffee grounds will be mixed with the mushroom spawn, and some other optional substrates to promote breathability and more nutrient intake. Inoculated grain spawn can be purchased from suppliers like Fungi Perfecti, which can then be added to the grounds. To preface, always work under sterile conditions during the inoculation phase! Use 70% alcohol to disinfect your hands, all surfaces, and all of the objects being used.
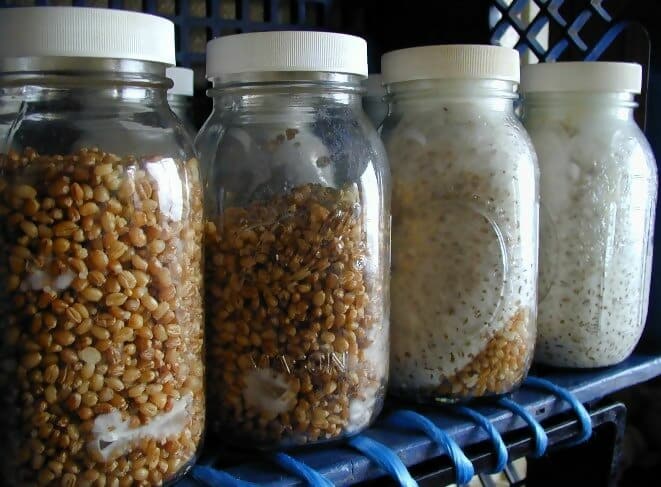
First obtain wide-mouthed jars, such as these quart size ball jars, or if it is a first time, wide-mouthed half-quart jars are ideal so that if contamination occurs, a lot of grounds aren’t lost. Instead of the normal jar lids, use synthetic filter discs designed for wide-mouth jars. Since fungi breathe just like we do, there needs to be adequate gas exchange to prevent the whole grow from becoming anaerobic and contaminated by mold. Contamination normally looks like dark green patches that eventually spread throughout the entire jar. This can happen from just one mold spore early on before the mushroom is the dominant species in the substrate, so sterile conditions and adequate airflow is absolutely crucial!
Collect coffee grounds after brewing, with the filter and grounds in hand, squeeze out all of the remaining water. Collect the grounds in a sterile zip lock bag in the freezer until you have enough to fill the jars. Alternatively, you can go to a local cafe and ask them if you can have their spent grounds. This is an easy way to get enough in the first day.
To inoculate, first fill the jars with the coffee grounds, which you can microwave if frozen to just over room temperature, or, ideally, let the grounds sit at room temperature for 24 hours to thaw. You can also add a bit of broken up straw or sawdust and mix that with the coffee grounds to reduce the density of the grounds. The mushroom spawn should be approximately 10% of the weight, and if mixing with other organic material, that should be approximately 20%. If you don’t have spawn available, you can also grow from stem butts. Grab some oyster mushrooms from a local market, and chop off approximately a quarter inch from the base where the fuzzy mycelium is located. Plant these mycelium-bearing stem slivers mycelium down into the substrate.
Since coffee grounds are very acidic, you can buffer the pH in the jar with about a teaspoon of gypsum. If you want to further reduce the chance of contamination, you can add a thin layer of dry vermiculite to the top of the substrate in the jar to keep a barrier.
Store the jar in a humid, shady, and warm location with adequate airflow and indirect sunlight. The jar will colonize in 3-4 weeks in the right conditions and then the mushrooms can grow directly in the jar but they are usually smaller this way. Once the jars are colonized, open the lid and scratch away the top layer of mycelium with a sterile fork. This will help to create an even pin set. Mist the jars until pins form, about 3-4 days, or alternatively, place a wet breathable cloth (like Tyvek) over the jar to maintain constant humidity.
Another option is to transfer the substrate to a larger container once colonization takes place. The substrate can be transferred to a larger sterile container, such as a bucket, shotgun fruiting chamber, or grow bag. If using a bucket, drill 5-10 quarter-inch holes around the circumference just above the substrate to allow adequate carbon dioxide ventilation and 5-10 on the bottom for drainage. The substrate, which may be mixed with more straw or other material, will then be misted twice daily between 55-75 degrees to promote fruiting.
Growing Outdoors
Outdoor grows can be achieved in a variety of ways, including in grow beds that require many steps such as compost preparation in grow trays and casing the mycelia. Outdoor grows are more unpredictable in terms of the four key environment factors (temperature, humidity, light, and carbon dioxide). If these are aligned optimally in your environment, outdoor operations can be a great choice. In general, avoid exposing the inoculated substrates to extreme temperatures, anything below 40F and above 80F will halt the growth of the mycelia. After the spawn colonizes, they are more resilient to temperature changes, as long as they do not become too dry or dehydrated.
When choosing an outdoor location, it’s important to choose a shady spot with indirect light that can be watered easily from a hose. As a beginner, growing on logs is one of the easiest, so we’ll focus on that method.
Growing on Logs
Certain mushrooms are commonly grown on logs, such as shiitake and oyster. Experts say that logs provide a more natural condition for mushrooms to fruit, leading to larger yields and better tasting mushrooms. Pre-inoculated oak logs can be bought from spawn suppliers such as here, These mushrooms already have the mushroom mycelium colonized within them, so all you have to do is place them in optimal growing conditions.
If you want to prepare them yourself, this is the general process:
- Start with fresh maple, oak, ironwood, or beech logs. To grow best, these must be freshly cut so that the fungus isn’t comp[eting with established organisms. Look for a log 3”-6” in diameter and about 2’-4’ in length.
- Obtain the spawn of the mushroom variety you’re looking to grow. Spawn be bought from suppliers in the form of wooden dowel plugs or pre-mixed with sawdust.
- In each log, cut/drill 1-2in holes around the logs with a 5/16in bit, in a diamond-pattern and about five inches apart from each other.
- After a few days, plug the holes with the spawn, and then fill them with food-grade cheese or paraffin wax to protect them from contamination by bacteria. Waiting a few days lets the natural antifungal agents in the tree decline, making colonization more likely.
- After inoculating, place the logs in the shade with as much surface area exposed as possible to be rained on. Keeping the logs out of the sun and wind to keep them from drying out. Alternatively, fruiting blankets can be bought to cover the logs.
- Once placed in a good, shady spot, keep the logs moist. Rinse the logs with a hose regularly (and keep the fruiting blanket moist) until pinheads appear. Once pins are visible, stop spraying as they can now handle higher temperatures.
- Once the veil of the cap lifts from the base, the mushrooms can be harvested with a small paring knife, cut from the base.
Each log has the potential to be reflushed for 3 years, and each log can produce approximately a pound of mushrooms per year. To maximize the yield, use many different logs and stack them in a criss-cross manner to let them get as much rain as possible over their surface. Shiitake mushrooms naturally fruit in spring or fall, naturally grow on oak logs, and can take 2-4 years to harvest in these cases. However, log growers commonly will force fruit the shiitakes by soaking the logs in cool water weekly. This tricks the plant into fruiting because the cooler temperatures and darkness emulates the fall.
Final Thoughts
Growing mushrooms at home is a great way to become self-sufficient with your food source and opens up tons of possibilities, including selling them at local markets and restaurants once the grow is scaled up. There is a ton of information to learn when getting into the world of mushroom growing.
Thankfully, there is an incredibly wide variety of great resources online to help with growing, as well as many great books by experts. A suggested book by one of the leaders in the mycology community is Paul Stamets’ Growing Gourmet and Medicinal Mushrooms. Additionally, online communities such as Mushroom Growers at Reddit are great resources that allow you to learn many different growing techniques and where you can communicate with other growers when troubleshooting or experimenting.